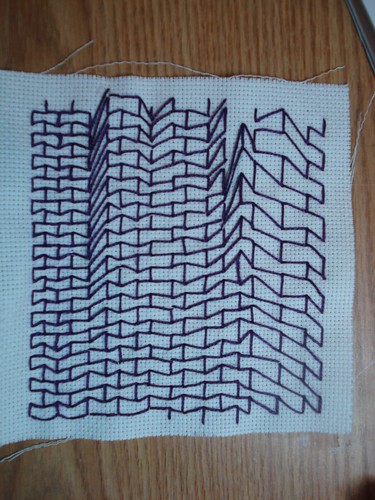
So this week, it was a catch up week for TAST and the challenge was to use up to 8 stitches in one piece. As I was caught up I decided to do the challenge.
I decided from the outset that I was going to be restricted by the size of my frame so a 8" circle and that I wouldn't have a design. Basically I doodled with stitches. I ended up doing fly, running, stem, chain butterfly, couching, french knot, bullion and detached chain.
Must admit I enjoyed this challenge but like all doodles its hard to say, stop! That is why this is posted on Tuesday rather than Sunday like I planned. Even as I stopped I was thinking, I could do even more.
I created this blog to follow my progress with the 2010 Bead Journal project.. Recently, came across an old challenge which I really enjoyed. Take a Stitch Tuesday 2012 run by Sharon Boggon.So I will be starting that in the New Year by which time I might have finished the journal. I will also continue to paint and draw- you will find them at my other blog - Puddle of Dreams. Roll on 2012
Tuesday, June 12, 2012
Thursday, June 7, 2012
catch up stitches
Well, I am managing to stay on track with the stitches but not with this blog, so time to up date.
first stitch - Bullion I found this stitch very hard at first and had to try several different types of needle but in the end I found the most unlikely of needles worked the best. A soft sculpture doll needle. Once I started using this I could vary the number of twists included and still have the control needed to keep the stitch flat once the thread went through the middle.
Next stitch up - Buttonfly chain. This was a very easy stitch but I am sad to say I really didn't explore it that much.
Lastly the knotted Cretan stitch which in the book I have is also called knotted insertion. Once I got the hang of the stitch I found it quite easy to do but I did have to watch my tension on the last part of the stitch, sometimes it was too loose.
So far I much happier with this piece as I have restricted the colours although I still don't like the border. Not sure if it is the combination of colours or the stitch its self which I found to be untidy (my stitching) and not attractive. Another decision I have made as I am not sure I like the blue of the material, is to continue adding stitches to both pieces- total of 52 stitches- 26 for each panel, rather than the original 13 stitches to each piece which would have created 4 separate panel. So I will have to explore the spaces between the spirals, I think it will work much better that way. Eventually I will find a way to stretch it like a canvas and then add a mount before framing them both.
So this week I was kind of disappointed that we are having a week's rest as that means we will be continuing this project to the end of Jan 2013 or even later if we miss additional weeks. No really a bit deal but I am going to put all the beads and embroidery aside for a while once I finish this project to concentrate on my painting. In the end I hope to incorporate all three into my work as I really don't see this is a craft but part and parcel of my art work.
Anyway, I have decided to take part in the small additional challenge of using up to 8 stitches on one single piece to be completed in a week. I will write about this in my next post.
first stitch - Bullion I found this stitch very hard at first and had to try several different types of needle but in the end I found the most unlikely of needles worked the best. A soft sculpture doll needle. Once I started using this I could vary the number of twists included and still have the control needed to keep the stitch flat once the thread went through the middle.
Next stitch up - Buttonfly chain. This was a very easy stitch but I am sad to say I really didn't explore it that much.
Lastly the knotted Cretan stitch which in the book I have is also called knotted insertion. Once I got the hang of the stitch I found it quite easy to do but I did have to watch my tension on the last part of the stitch, sometimes it was too loose.
So far I much happier with this piece as I have restricted the colours although I still don't like the border. Not sure if it is the combination of colours or the stitch its self which I found to be untidy (my stitching) and not attractive. Another decision I have made as I am not sure I like the blue of the material, is to continue adding stitches to both pieces- total of 52 stitches- 26 for each panel, rather than the original 13 stitches to each piece which would have created 4 separate panel. So I will have to explore the spaces between the spirals, I think it will work much better that way. Eventually I will find a way to stretch it like a canvas and then add a mount before framing them both.
So this week I was kind of disappointed that we are having a week's rest as that means we will be continuing this project to the end of Jan 2013 or even later if we miss additional weeks. No really a bit deal but I am going to put all the beads and embroidery aside for a while once I finish this project to concentrate on my painting. In the end I hope to incorporate all three into my work as I really don't see this is a craft but part and parcel of my art work.
Anyway, I have decided to take part in the small additional challenge of using up to 8 stitches on one single piece to be completed in a week. I will write about this in my next post.
Friday, May 11, 2012
Crossed buttonhole and half chevron
So I am keeping up with TAST and this week was half Chevron and last week was crossed buttonhole stitch.
I did the border of the piece with variations of crossed buttonhole which took me a while to figure out.

Even then I was not happy with it as it became very uneven and to be honest a bit ugly, especially with the close up photos
I will live with it but I think its a stitch I will avoid in the future
I will be adding French knots to all 4 borders
This week's stitch was half chevron stitch. Again I had difficulty to visualising this stitch but the outcome I was really happy with. I think I will explore this a bit more before the next stitch
I did the border of the piece with variations of crossed buttonhole which took me a while to figure out.
Even then I was not happy with it as it became very uneven and to be honest a bit ugly, especially with the close up photos
I will live with it but I think its a stitch I will avoid in the future
I will be adding French knots to all 4 borders
| This is what it looks like with all 4 borders. |
Sunday, April 29, 2012
French Knots, Stem stitch and Wheatear
Just a short post to show my progress with TAST. I used dislike French knots but now I could go on doing them all day. Once I relaxed and didn't put the pressure on myself to make them perfect every time, they seem to actually get better. I think this piece will have French Knots all over it. I like the colour combination for this panel as well. Haven't quite finished with the Wheatear stitch but thought I would post on time for a change. First time I have actually been ahead of the curve for this challenge. Hope I can keep it up
| French Knots |
| stem stitch |
| Wheatear and French knots |
| French Knot, stem stitch and Wheatear |
| Wheatear |
| continuing panel 1 |
Friday, April 20, 2012
Wow its been a long time since I have posted, so I should update. To be honest really haven't been that busy as the creative bug has been very reluctant to show its head recently. I know you should just go to the studio and work through it but actually getting there is the difficult part.
Anyway, I have been plodding along with Take a stitch Tuesday (TAST), its not my most inspired work :( I started off with 14 count aida which I transferred a pattern to. However, I soon came to the conclusion that wasn't going to work. So I went through my stash of material scraps and picked a tied dyed fabric which is blue and brown. My plan was and still is to do 13 samples stitches on each piece of material which I will then mount on a piece of canvas and stretch like a canvas. The one thing I will change with #2, is to restrict the colours I use as I realised that I wasn't liking the colour I used in the first piece. Anyway below are pictures of #1. It is still incomplete but if I waited until it was complete I might never post it which isn't really what the challenge is about. I have not varied the thread, using my stash of pearl cotton and it is purely stitching, no embellishments, no beads!
I will admit the fabric is not my favourite but I really wanted to explore the more abstract side of stitching. I will be more diligent with my posting in the coming weeks as I have reorganised my work space and hopefully that will be make it more inviting to work in.
Anyway, I have been plodding along with Take a stitch Tuesday (TAST), its not my most inspired work :( I started off with 14 count aida which I transferred a pattern to. However, I soon came to the conclusion that wasn't going to work. So I went through my stash of material scraps and picked a tied dyed fabric which is blue and brown. My plan was and still is to do 13 samples stitches on each piece of material which I will then mount on a piece of canvas and stretch like a canvas. The one thing I will change with #2, is to restrict the colours I use as I realised that I wasn't liking the colour I used in the first piece. Anyway below are pictures of #1. It is still incomplete but if I waited until it was complete I might never post it which isn't really what the challenge is about. I have not varied the thread, using my stash of pearl cotton and it is purely stitching, no embellishments, no beads!
I will admit the fabric is not my favourite but I really wanted to explore the more abstract side of stitching. I will be more diligent with my posting in the coming weeks as I have reorganised my work space and hopefully that will be make it more inviting to work in.
Sunday, January 8, 2012
Jeremy Cruey
There will new posts about my own work in the next week as I am working on a few things at the moment but in the meantime I am posting a couple of pictures of a small sculpture I got at Christmas. It was created by my daughter's very talented brother-in- law, Sculptor Jeremy Cruey.
He doesn't have a website yet but you can see more of his work at High-Mountain-Ironworks facebook page
![]() |
| here is one of his larger sculptures. Mermaid (pictured unfinished) |
Monday, November 29, 2010
Its the end of Novemeber but I have only just decided August is finished
I actually finished it at the end of October before I made a brief visit to the UK but I at the time, I wasn't convinced as it was so unlike the calendar image I was using but when I got back, I just knew it was complete.
As usual I felted the ground of this image but instead of just using wool fibres, used some synthetic materials I had collected in my time, working at Joann's. Some of them didn't work but it was simple enough to pull them out and try something else. The bottom half of the piece is covered with shell pieces but the rocks on the right hand are some paper beads I made especially for this project. I was pretty pleased with them :). Below is the image I was working from and as you can see the rocks are probably the only thing that are similar. However, I like the feeling of depth I have managed to create in this work and would say its one of the more successful months. The sky is pretty ominous with the lurex material peeping out like some alien arriving. I love the way the synthetic materials have managed to create some movement in the body of water.
I was going to add more beads to the cliff face but decided I loved the machine stitching too much to cover it up, so in the end, just added a few beads between the cliff and the sky.
Image removed.- see this blogger's post on copyright -
Only 4 months left to do but then again only one month to go of the year. I have felted the beginnings of the Sept, Oct and Nov but being realistic, know they wont be complete until at least the end of January.
As usual I felted the ground of this image but instead of just using wool fibres, used some synthetic materials I had collected in my time, working at Joann's. Some of them didn't work but it was simple enough to pull them out and try something else. The bottom half of the piece is covered with shell pieces but the rocks on the right hand are some paper beads I made especially for this project. I was pretty pleased with them :). Below is the image I was working from and as you can see the rocks are probably the only thing that are similar. However, I like the feeling of depth I have managed to create in this work and would say its one of the more successful months. The sky is pretty ominous with the lurex material peeping out like some alien arriving. I love the way the synthetic materials have managed to create some movement in the body of water.
I was going to add more beads to the cliff face but decided I loved the machine stitching too much to cover it up, so in the end, just added a few beads between the cliff and the sky.
Image removed.- see this blogger's post on copyright -
Only 4 months left to do but then again only one month to go of the year. I have felted the beginnings of the Sept, Oct and Nov but being realistic, know they wont be complete until at least the end of January.
Sunday, October 24, 2010
July - Finally!
Almost the end of October and finally I have decided July is finished. I actually finished all bar one bead and the edging in August but I thought maybe it needed more. However, I was unsure as I knew I didn't want to bead it other than the tree when I started but I was tempted to bead some of the background.

So I got into September and that is really where the creative block hit me slam bang in the the head. That story will be told in the next couple of days. However, I due to that, all creative work came to a shuddering halt and I didn't ever go into my work space for weeks - even the door made me nervous. Finally on Friday, I entered the cave of fear and just looking at the July piece, I knew it was finished all bar the one right bead plus a sequin which had been selected before I had even started and the edging.
This afternoon, I hope to complete August and September started. Now I am back into the swing of it, I know I will complete this journal by the end of December.
Edited after looking at my photo files and realising I was wrong - this is only July! So once I have finished August in the next couple of days - hopefully this afternoon, I will still have 4 more months to do. However, its still doable but its not a race. However, I do want to start painting seriously come Jan 1st 2011!

So I got into September and that is really where the creative block hit me slam bang in the the head. That story will be told in the next couple of days. However, I due to that, all creative work came to a shuddering halt and I didn't ever go into my work space for weeks - even the door made me nervous. Finally on Friday, I entered the cave of fear and just looking at the July piece, I knew it was finished all bar the one right bead plus a sequin which had been selected before I had even started and the edging.
This afternoon, I hope to complete August and September started. Now I am back into the swing of it, I know I will complete this journal by the end of December.
Edited after looking at my photo files and realising I was wrong - this is only July! So once I have finished August in the next couple of days - hopefully this afternoon, I will still have 4 more months to do. However, its still doable but its not a race. However, I do want to start painting seriously come Jan 1st 2011!
Monday, August 23, 2010
JUNE Page at last
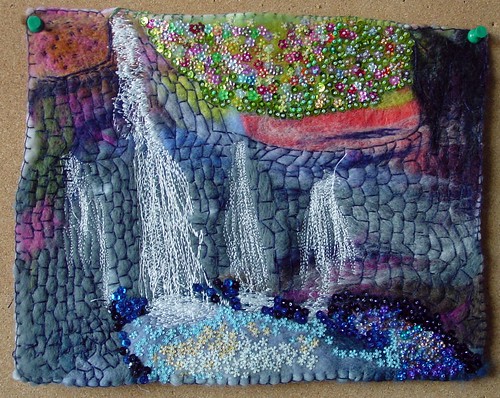
This was started way back in May and only now in last grasps of August has it been finished. It was delayed mainly because I wasn't sure how to approach the rock face of the waterfalls shown in the Calendar picture
Image removed see this bloggers post on copyright
I knew I didn't want to use beads as I figured that would make it very heavy and I really wasn't sure how they would compare to the sequins I knew I was going to use in this piece.
Embroidery seemed to the answer but which stitch? I looked at my trusty stitch sampler by Lucinda Ganderton and came across the Japanese daring stitch. I quickly set to task with making a sampler as I wanted to be confident (1) I could do it and (2) it would work.

Even with this pass I could see the possibilities of this stitch and decided to stitch over it with more Japanese darning stitch but in a different colour and it became even more dimensional.

With that little exercise out of the way I was able to concentrate on page and overall I am very satisfied with this page.

July has been started whilst working out the ending of the last page and should be finished by the end of the week. August not started but will be started by the end of the week - so for a change I am feeling pretty much up to date with this project.
Image removed see this bloggers post on copyright
I knew I didn't want to use beads as I figured that would make it very heavy and I really wasn't sure how they would compare to the sequins I knew I was going to use in this piece.
Embroidery seemed to the answer but which stitch? I looked at my trusty stitch sampler by Lucinda Ganderton and came across the Japanese daring stitch. I quickly set to task with making a sampler as I wanted to be confident (1) I could do it and (2) it would work.

Even with this pass I could see the possibilities of this stitch and decided to stitch over it with more Japanese darning stitch but in a different colour and it became even more dimensional.

With that little exercise out of the way I was able to concentrate on page and overall I am very satisfied with this page.

July has been started whilst working out the ending of the last page and should be finished by the end of the week. August not started but will be started by the end of the week - so for a change I am feeling pretty much up to date with this project.
Thursday, July 8, 2010
May Journal Page
Well, I am not happy with it but figure I need to finish otherwise I will be here until the new year before I decide its 'finished'. Always the hardest part of doing any art work is when is it finished and when that piece is not 'happy', it never seems to be finished.
The original calendar photograph on first looking at it seems to be one mass of very orange stone with a tree standing strong against the elements. Seeing on this page it doesn't look so orange and much more defined but the actual photograph I was working from, is much more densely orange.
Image removed. See this bloggers's post on copyright
Then you look closely at its really full of life with grasses and other small trees. So I started out with the overall image but as I worked on I began to see all the other elements which is where my problems started I think. As I added to it the more muddy it got (just like a painting) and the heavier it got.(just weight it and it nearly ½lb!).
So I have decided to leave it where it is - for now
The original calendar photograph on first looking at it seems to be one mass of very orange stone with a tree standing strong against the elements. Seeing on this page it doesn't look so orange and much more defined but the actual photograph I was working from, is much more densely orange.
Image removed. See this bloggers's post on copyright
Then you look closely at its really full of life with grasses and other small trees. So I started out with the overall image but as I worked on I began to see all the other elements which is where my problems started I think. As I added to it the more muddy it got (just like a painting) and the heavier it got.(just weight it and it nearly ½lb!).
So I have decided to leave it where it is - for now
Thursday, June 3, 2010
April 2010
This has been sitting waiting for a few weeks, whilst I settle with it. Like previous months I have needle felted a background on to a piece of craft felt, then I did some free machine embroidery to create the initial structure of the image. Then I basically built up the texture with beads and embroidery using some fuzzy wool I pick up cheaply over the years. Its quite a heavy piece!
This is the image I started with . Image removed see this blogger's post on copy right
May is still a work in progress and given that I have decided to bead the whole surface of the piece it might well be a while before it is complete But here is a teaser
Sunday, May 16, 2010
March
This is the picture I started out with and there is no way I captured the luminosity of this scene but I tried.- Image removed see this bloggers post on copyright
The process began with felting very broadly onto a piece of craft felt, then some embroidery and free machine stitching, finishing with the beading, followed by more embroidery.
I think stretching it (the process has warped the base fabric) and providing a backing sheeting might make it clearer, we will see.
As a teaser, here is the beginning of April which is actually much further on and probably as close to being finished as this March is.
Saturday, March 27, 2010
Well Its been a long long time between posts
but finally I feel ready to post about my progress.
Basically, I came to the end of February and thought to my self - this is not going to work! It is way too ambitious and I am letting myself fail again. So I changed course :)
I am still working on the calendar idea and fortunately until this year we have had lots of pictorial calendars in the house. As I was wondering what I was going to do with this project I spied another calendar just lying on my work desk from last year and so the project was renewed but on a must more modest level.
this is the photo for January (Talbot Bay on the Buccaneer Archipelago) and this is what I have created so far from it.- Image removed see this blogger's post on copyright
The base is a white felt rectangle bought from any craft shop. On that I have needle felted the main colors and then I added embroidery and some beading. At the moment I am not sure if it is finished or not but the main components are there.
This is February, a wonderful photo of Thring Rock on the Canning Stock Route, Australia
The based is exactly the same as the previous month although a lot of this was felted on my felting machine (which I bought rather impetuously last year. Little did I know the needles are outrageously expensive and very fragile!)
Unlike my previous attempts at this project in January where I tried to make so sort of progression from idea to form, these works are purely reacting to what I see and feel about the images in front of me. There is no extensive drawing or wondering what is going where. I just place the wool roving on the felt and punch away! I think they are working so much better because of that
This is the one I am currently working on, Sunrise over the Thomas Rive, Cape Arid National Park.- Image removed - see this blogger's post on copyright
This is my is my progress so far. Again the base is a white felt rectangle with wool roving needled felting. Then I embroidered the top and then free machined the middle bit. This is a new technique for me and I am loving the texture it gives me. I have feeling this is about half way done.
I am feeling so much better about this project than I did just 2 weeks ago and know that this is the right direction for this year. From last years failed attempt and this year's failed beginning, I am realising that much of my art is based purely on instinct and not on planning. If I think too much about it, I freeze up and become overly concerned about what I am doing.
As for the previous work, I am still going to work on them as I have January and February started but now the pressure is off, maybe they will evolve and grow into something I want to share but but not at the moment.
Basically, I came to the end of February and thought to my self - this is not going to work! It is way too ambitious and I am letting myself fail again. So I changed course :)
I am still working on the calendar idea and fortunately until this year we have had lots of pictorial calendars in the house. As I was wondering what I was going to do with this project I spied another calendar just lying on my work desk from last year and so the project was renewed but on a must more modest level.
The base is a white felt rectangle bought from any craft shop. On that I have needle felted the main colors and then I added embroidery and some beading. At the moment I am not sure if it is finished or not but the main components are there.
This is February, a wonderful photo of Thring Rock on the Canning Stock Route, Australia
Image removed - see this blogger's post on copyright
The based is exactly the same as the previous month although a lot of this was felted on my felting machine (which I bought rather impetuously last year. Little did I know the needles are outrageously expensive and very fragile!)
I am feeling so much better about this project than I did just 2 weeks ago and know that this is the right direction for this year. From last years failed attempt and this year's failed beginning, I am realising that much of my art is based purely on instinct and not on planning. If I think too much about it, I freeze up and become overly concerned about what I am doing.
As for the previous work, I am still going to work on them as I have January and February started but now the pressure is off, maybe they will evolve and grow into something I want to share but but not at the moment.
Thursday, January 28, 2010
Progress on January 2010
Well to be honest, I haven't made as much progress as I would have like and only today have I actually put some beads on the work and it's already 1/28/2010, only 3 days to the end of the month.
However, at least I have started and I think the biggest barrier to my progress is the lack of confidence that I can actually pull this off.
This is my initail drawing and based very much on the original painting. Its is approximately 18x24 and that will be the size of the finished piece.

This the first colour study I did on paper. Its not as abstract as I would like it be and the colour base that I have transferred to the linen canvas is still too reliant on the original painting.
As I worked on the drawing and under painting, I also created my own masks from paper clay. Working on these made me realise that I really need to do some more figure drawing work as I had no idea on how mold the face, even when looking at modelling books (I once thought I could do polymer clay figures but quickly realise I don't have the patience or inclination to do such detailed work) However I continued in my pursue and ended up with 8 masks that I might use in the final piece (they are a bit thick :( )
So now I have the painting on canvas (from a roll I bought several years ago, I am determine to use what supplies I already have), what do I do now? I rumaged through the fabric I had and rather tacked on a few pieces to see what it looked like. Unfortunately, in my rush to get them down, I wasn't really thinking and used glue on satin and brocade material . I have since replace the brocade material with another piece as the stain caused by the glue was too distracting. With the satin, I think I can remedy that with some embroidery.
As I said I am now on stage 5 and beginning to add embroidery and beads. Somehow I need to integrate all the parts into one to create a unified picture surface. I am beginning to like the top and bottom but the middle is just the middle at the moment. I think the white shape of the figure is going to be the key to resolving this problem.
However, at least I have started and I think the biggest barrier to my progress is the lack of confidence that I can actually pull this off.
This is my initail drawing and based very much on the original painting. Its is approximately 18x24 and that will be the size of the finished piece.
This the first colour study I did on paper. Its not as abstract as I would like it be and the colour base that I have transferred to the linen canvas is still too reliant on the original painting.
As I worked on the drawing and under painting, I also created my own masks from paper clay. Working on these made me realise that I really need to do some more figure drawing work as I had no idea on how mold the face, even when looking at modelling books (I once thought I could do polymer clay figures but quickly realise I don't have the patience or inclination to do such detailed work) However I continued in my pursue and ended up with 8 masks that I might use in the final piece (they are a bit thick :( )
So now I have the painting on canvas (from a roll I bought several years ago, I am determine to use what supplies I already have), what do I do now? I rumaged through the fabric I had and rather tacked on a few pieces to see what it looked like. Unfortunately, in my rush to get them down, I wasn't really thinking and used glue on satin and brocade material . I have since replace the brocade material with another piece as the stain caused by the glue was too distracting. With the satin, I think I can remedy that with some embroidery.
As I said I am now on stage 5 and beginning to add embroidery and beads. Somehow I need to integrate all the parts into one to create a unified picture surface. I am beginning to like the top and bottom but the middle is just the middle at the moment. I think the white shape of the figure is going to be the key to resolving this problem.
Subscribe to:
Posts (Atom)